Making Photo Essays Easy
Betsy Sergeant
Abraham Lincoln High School
San Francisco, Calif.
Lesson Title: Making Photo Essays Easy
Overview and Rationale:
This lesson is divided into two parts. Part I is a creative exercise to get students to generate ideas about what makes a good story and a photograph. Part II requires student to then tell a story through photographs, or to create a photo essay.
Goals for understanding:
- Students will recognize the qualities of a strong photograph.
- Students will tell a story through powerful photographs.
Resources and Materials:
- Newspapers and/or magazines
- Old photographs
- Cameras
- Poster board or PowerPoint
Overview and Timeline:
This two-part lesson is designed so that each part could stand on its own. Allotted time will depend on camera availability and class time. Suggested time is 4-5 50 minute class periods.
Activities
Part I
Day 1
Activity 1 (10 minutes):
Before you begin with photos, take the time to help students remember the elements of good story in literature, as well as in journalism. Strong stories include the following elements:
- Exposition
- Setting
- Plot
- Theme
- Characters
- Protagonist
- Antagonist
- Rising Action
- Climax
- Resolution
- Irony
- Foreshadowing
- Flashback
Activity 2 (30-45 minutes):
- Using already published material, have groups of 4 students collect 10 or so photos and assemble them into a story. The results may be silly or serious; the object here is to have students create the story from photos they already have. The students will fix the photos to a poster board according to the story they created.
Activity 3 (15 minutes):
- Their classmates will then try to figure out what story the photos are telling. The group will then share the story they came up with and they will discuss why they chose the photos they did. Save the presented stories for the next session.
Day 2
- Activity 1 (30 minutes):
- Students identify the strongest photos in each story from previous day. In their groups they will generate a list of what they believe makes a good photo. This should get students thinking about:
- angles
- Perspective
- Composition
- framing
- lighting
- emotions
- details
- Student will also discuss the following:
- How they were limited by working with photos that already exist?
- What photos had they wished were available?
- Was their story successful?
- Did it catch attention? Why or why not?
- Did the photos represent what was really happening in their stories?
- Activity 2 (20 minutes)
- Students will then generate lists of what they think constitutes a good Selection or series of photos. This will be the spring board for telling them about effective photo essay elements, such as:
- varied perspectives
- varied distances
- angles
- changes in lighting
- Elements of the story that are not obvious to the reader.
- Focusing on different people involved
- Rule of thirds
- Variety of sizes and shapes of photos
- Dominant photographs
- Find some examples of photo essays to share with the class. One example is:http://www.motherjones.com/
news/feature/2002/37/ma_111_01.html- To find others, use Google to search for “photo essays”. Be sure to point out examples of the above topics.
PART II
Day 3
- Activity 1 (one class period and homework)
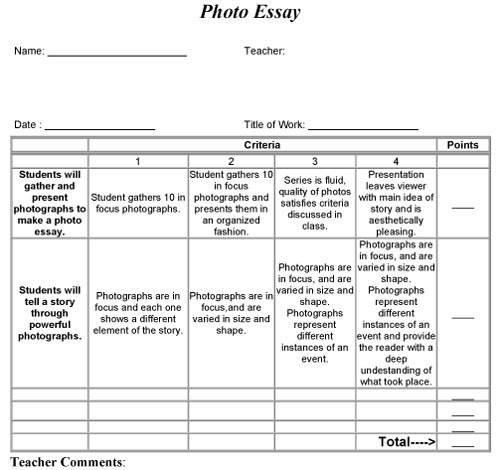
- Here begins the photo essay assignment. Students will choose a story to cover using only photos. They must produce at least 10 photos, and the only restrictions are that they cannot use ANY words to tell a story. (You can add cut-lines to the assignment later.) Depending on availability of cameras, you may choose to have teams of students. Give them a deadline, and specify how you want the photos presented. Some ideas include:
- Have students compile photos in a PowerPoint slideshow
- Have students fix photos to poster board
Day 4
- Activity 1
- Let students display their photo essays around the room. Let the class circulate to try to figure out the story for each collection of photographs. Students will write brief paragraphs about each photo essay. They will also write questions they feel are left unanswered by the photo essay. Allow the class time to share their findings.
Day 5
- Activity 1
- Each group will discuss their photo essay with the class. Students should be prepared to explain their choices and motivations behind the photos included. They will also note questions and feed back from the class.
Follow-up lessons:
- Cutlines
Assessment:


